Friday, December 28, 2012

Improvising a Quit Top Finish

I don't typically make New Year's Resolutions but if I did, this year's may be to plan in advance.  At least when it comes to quilting projects.

I posted about this quilt top once before, it's for a friend of mine who lives in Phoenix who was part of the running team I was on when Shelly passed away.  I had only met her the day before but she showed herself to be one of the strongest, most positive, supportive people I have ever known and she will be a forever friend.

When she found out I sewed, she asked for a quilt.  She was kidding -- sort of -- but I knew right away she would get one.  She recently bought a new house and hasn't decided what colors she wants to use, but she told me black and white are her favorites.

I started with 2 charm packs purchased online and came up with this:


I liked it enough (even though HSTs are *not* my strong suit)... but it was too small.  Only 50" wide x 57" long.  That wasn't going to work.  I can't tell you how many nights I fell asleep trying to figure out how to make it bigger without looking like I just slapped on some extra fabric... but on Christmas Eve night, it was a vision of this quilt (and not sugar plums) dancing in my head.  

First, I turned the quilt sideways, so 57" became the width instead of the length.  Then I took off the (now) top and bottom borders.  If there's anything that ranks as low as pinning in my "things I like to do" book, it's ripping stitches!


Next, I created a few rows of checkerboards for the top and bottom, to add between the HST section and the borders I'd just taken off.  I would have done more, but I was out of charms.


Here's how it looks with one side (the bottom) sewn back together.  Of course, I had to extend the side borders to go the (new) full length.  I was lucky to have *just* enough fabric left to do this.


Here's how it looks with the side (near the top) borders lengthened, before I sewed it all back together:


And finally, the completed (I hope!) quilt top, now big enough to cover a full grown person:


I've started piecing a back, which will be more colorful.  I haven't a clue how I'll quilt this once it's done.  The middle (HST) section is bulky and doesn't lie completely flat.  I want to do something relatively simple (read: won't take forever) but I haven't decided what yet.  Suggestions are appreciated!


~~~~~~~~~~~~~~~~~~~~~~~~~~~~~~~~~~~~~~~~~~~~~~~~~~~~
Linking up with Sarah at Confessions of a Fabric Addict for Whoop Whoop Friday
~~~~~~~~~~~~~~~~~~~~~~~~~~~~~~~~~~~~~~~~~~~~~~~~~~~~

~*~ May your day be full of Love and Ladybug Hugs ~*~
Thanks for stopping by!
~ Kat ~

Friday, December 21, 2012

Angels with Flashlights

It feels like this quilt has taken forever and no time at all, all at the same time.  Though this quilt started from a very dark place, I couldn't be happier with this finish.  It represents all the wonderful things in my life and the beauty that lies beneath even the most tattered of edges.  Light shining through darkness, like angels with flashlights.


There are plenty of imperfections in this quilt but I don't care.... each and every one of them was a part of the process and they serve as a reminder that nothing in life is perfect, but that doesn't mean life is not beautiful.


This post talks about the significance of each once.


The quilt 58 x 70 after washing. I FMQ'd with black in all the black spaces and on the colored spots, I used a coordinating color thread on top and pink in the bobbin.


Even though my squiggles and loops aren't perfect, I still love how the back looks.


Wishing you all love, health, happiness, fun and ladybug hugs this holiday season and always.

~~~~~~~~~~~~~~~~~~~~~~~~~~~~~~~~~~~~~~~~~~~~~~~~~~~~
Link up with Sarah at Confessions of a Fabric Addict for Whoop Whoop Friday
~~~~~~~~~~~~~~~~~~~~~~~~~~~~~~~~~~~~~~~~~~~~~~~~~~~~


~*~ May your day be full of Love and Ladybug Hugs ~*~
Thanks for stopping by!
~ Kat ~

Monday, December 17, 2012

How to help Sandy Hook Elementary


I was on a cruise ship in the middle of the Atlantic Ocean when I heard of the tragedy at Sandy Hook Elementary School in Newton, Connecticut last week.  My husband and I stared at the television in disbelief, much like we did on September 11, 2001.  It took some time to register the magnitude of what had happened but once it hit, the tears flowed freely and continue today.

I am a mother of two precious little girls.  I am a daughter / sister / friend of educators.  I am an American.  And I am in shock.  I want to help, but I am not sure how.  No words, no donations, no anythings could possibly ease the pain that community is feeling right now, that all of us are feeling right now.  But we, this crafting / quilting / online community of bloggers is so strong and so generous and so caring that I know we can find a way, even through our tears.

If you know of anyone in our online community who is already working on a way to help, could you please leave a comment with a link?  I'm not sure what is already underway but I'm sure there's something.  If not, I have a few ideas on things we could do.

In the meantime... I know this is small... but I think it is a great way to show Sandy Hook that every parent, grandparent, American or fellow human is standing behind them during this unthinkably tragic time.

Here is a link to the PTA (Parent Teacher Association) membership form for the Sandy Hook School District.  Print out page 2 of this form, write a check for $7.00 (the cost of a PTA membership) or any amount you are able to give.... perhaps include a hand written note of support.... 

Checks can be made payable to SHS PTA

Mailing address is: 
Sandy Hook Elementary School
Attn: PTA Membership
12 Dickenson Drive
Sandy Hook, CT 06482

Let's join together to show Sandy Hook Elementary and Newton, CT how much love and support and prayer is behind them right now and in the weeks / months ahead as they try to come to grips with this unthinkable loss. 


~*~ May your day be full of Love and Ladybug Hugs ~*~ \

Thanks for stopping by!
~ Kat ~

Friday, December 7, 2012

How I made my "Kat Quilt" blocks

A few people have asked me if I'd share the method I used for making the "Kat Quilt" blocks.  Below are the steps I followed.  I started out by making them up mostly as I went along, but I did learn a few tricks along the way that made the later blocks much easier than the first few.  There are photos below each step which will hopefully illustrate each one.  If anything is unclear, please let me know and I'll do my best to clarify!  


These are my 20 blocks, before I sewed them together and added the borders.


I've said it before and I'll say it again... the quilt I made will not win any prizes for technique or color placement, but each and every single component of it means something incredibly important to me --- every shape, every color, every fabric.  Whenever I look at it, I'm reminded of so many people, events or other memories that helped shape my life and I feel wrapped up in love and courage and strength.  I can't think of a more perfect quilt.  

I haven't provided exact cutting instructions or fabric amounts, only the technique.  Since this is such a personal kind of quilt, you could adjust this method to any size block and make as few or as many as you'd like.


~*~*~*~*~*~*~*~*~*~*~*~*~*~*~*~*~*~*~*~*~*~*~*~*~*~*~*~*

Step 1: Determine how big you want your finished block to be and cut your top fabric 1" bigger.  
I wanted my blocks to finish at 12", so I cut them at 13".  You can select any size you'd like but if they are a little bigger, you'll have more flexibility with the designs.  You'll trim them down a little more later.

13" square of the main (top of the block) fabric.


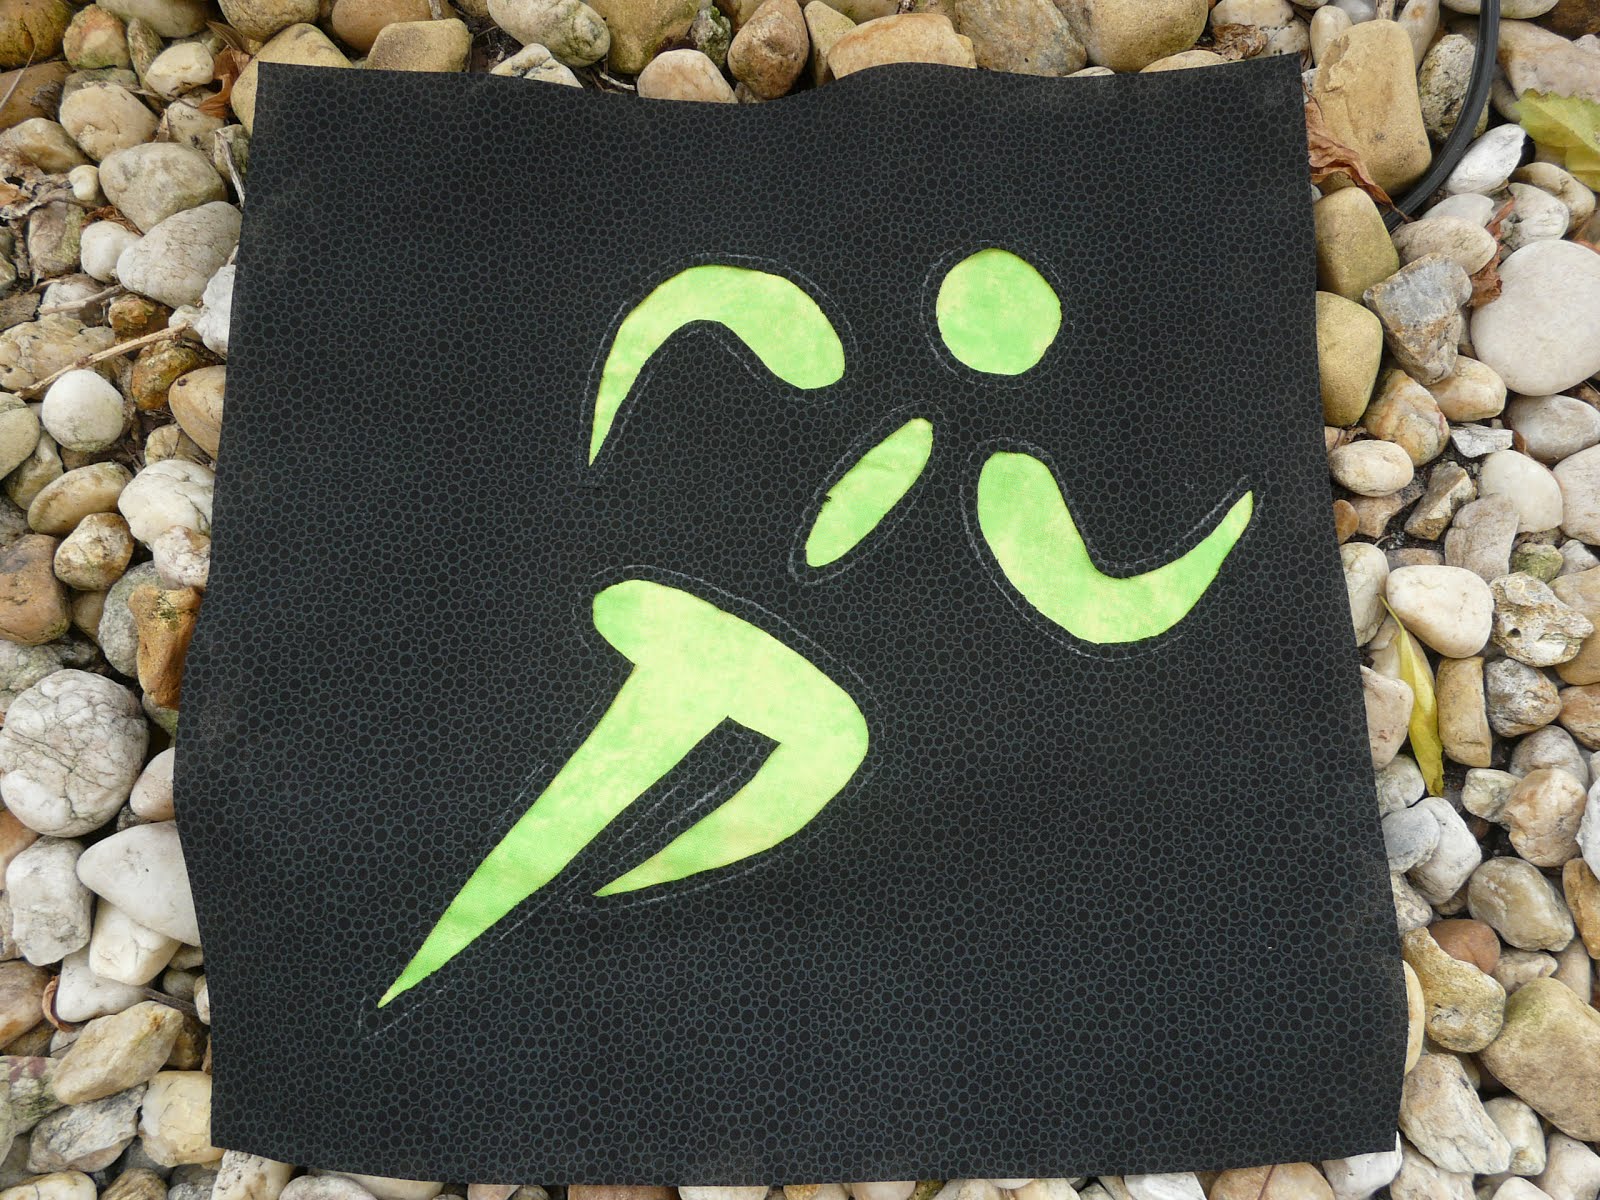
Step 2: Choose your shape and draw it on your block with a washable marking pen or chalk.
I spent a lot of time selecting 20 different shapes for my quilt.  Each one means something very important to me.  Some I found online and others I sketched free-hand.  You will want to pick basic shapes (think "coloring book") and make sure your shape is at least 1" smaller than your finished block size.  For example, my finished blocks are 12", so no shape is bigger than 11".  In most cases, I opted to leave a little more free space around the edges and kept my shapes no bigger than 10".  I traced (or drew) the outlines onto my blocks using a chalk pencil, but you could use any removable marking pen.

For this example, I'll show you how I made my Florida block.  This is a shape I found online then enlarged and printed out.

You can see better in this photo how I eliminated some of the sharp edges when I cut it out.  It is enough to have a shape that *looks* like Florida, it didn't need to have every single inlet showing.

Here's how my block looked after I traced on the shape with a white chalk pencil.


Step 3: Piece together the fabrics which will show through your shape, making this pieced portion 1" bigger than your shape.
Here is another opportunity to select fabrics and colors that mean something special to you.  You may select only 1 fabric or multiple, focusing on one color or several.  Think about the shape you are using for this block and what memories go along with it.  This may remind you of a specific color, fabric, person (who has a favorite color), etc.  Your "underneath" piece does not need to be as big as your finished block, it just needs to be as big as your shape / opening will be, plus a little room (at least 1/4", but 1" or more will be easier to work with in the next step).

This block used simple shapes underneath in colors representing sand, ocean, blue sky and sunshine.  You may choose to use more scraps, make a patchwork or anything else you can think of, as long as the pieced shape is bigger than your drawn shape.  The paper cutout helped me determine color placement and size.  In this example, the piecing is bigger than it needs to be, but those were the scraps I had on hand so I used them as is.


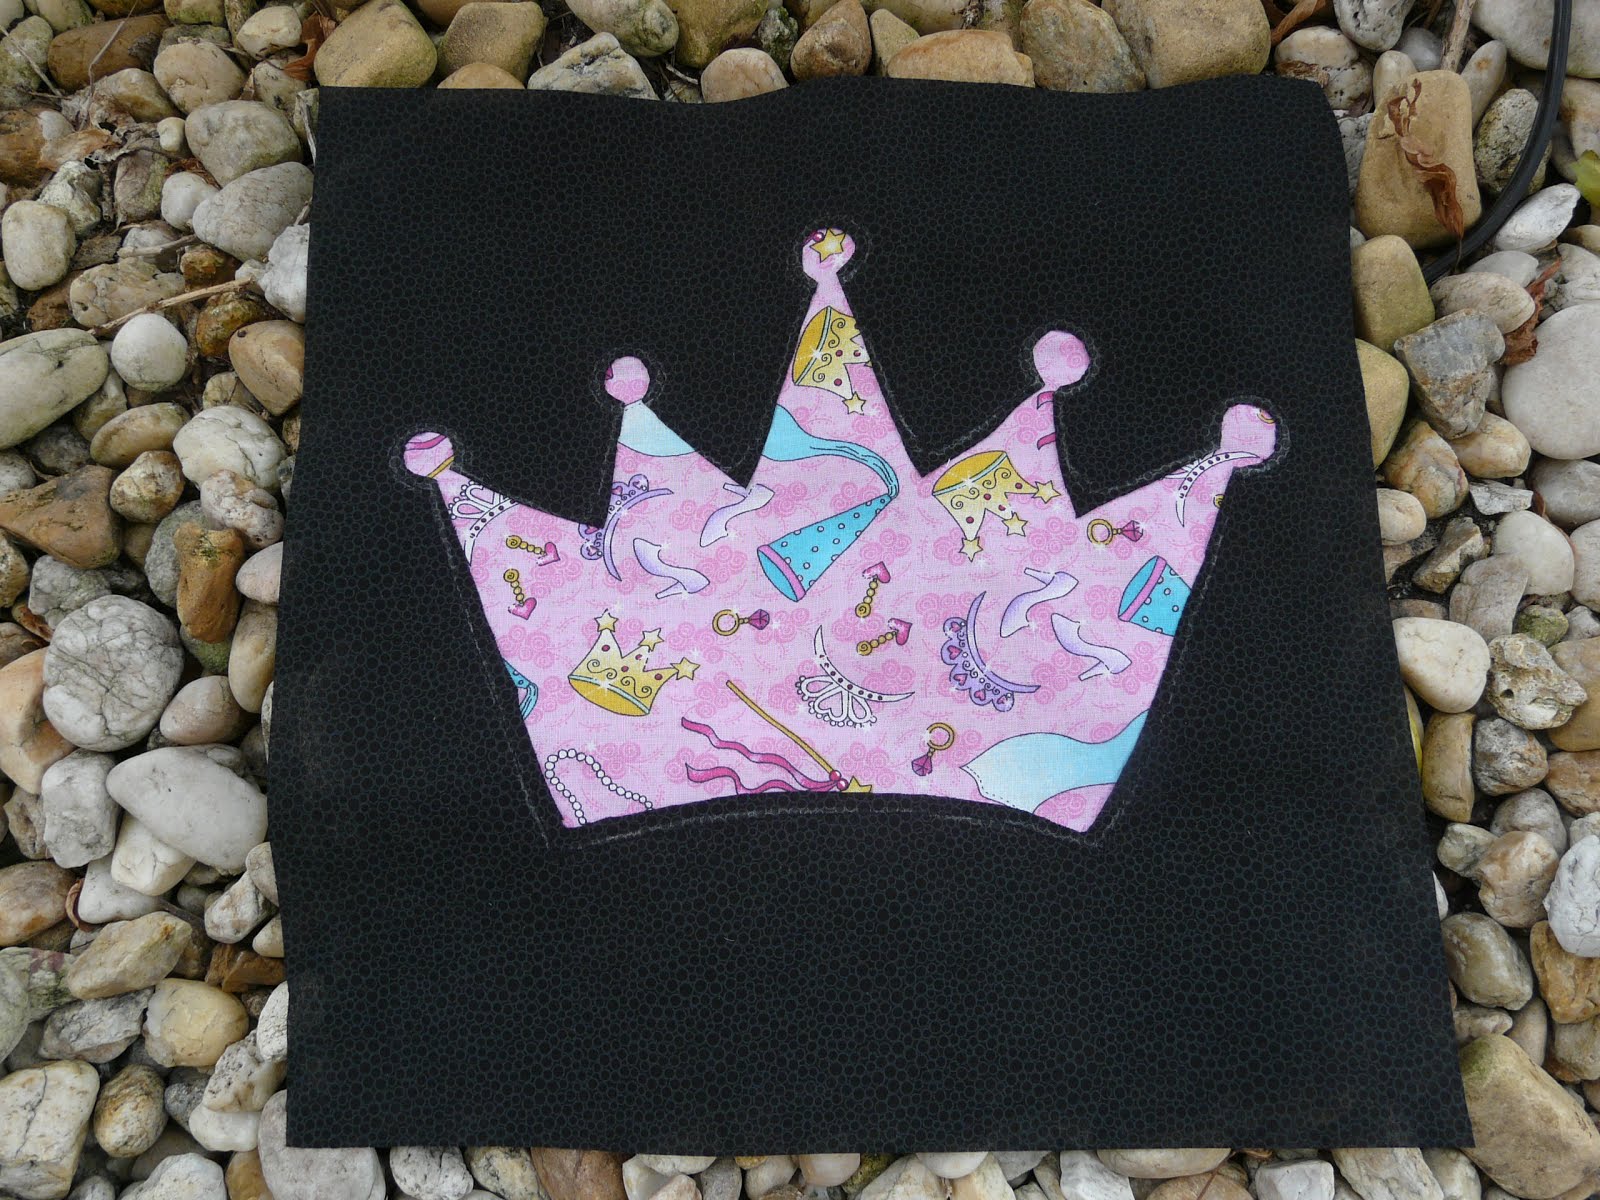
Step 4: Layer and pin the top (shape) block to the underneath (pieced) fabric.  
Lay the pieced portion face up on your sewing table.  Carefully place your top layer (with the shape drawn on it) on top, also right side up.  Take care to ensure that your shape will have a pieced layer underneath all of it.  You may need to lift up the edges of the top (shape) block or pick up both layers together and hold them up to the light, to be sure your opening will be covered all the way around, with at least 1/4" around each side.  Pin these layers together from the top using straight pins.


Pieced fabric is right side up.  Top fabric is also right side up.  Drawn shape (on the top fabric) is placed so there is piecing under all of the drawn shape.

Different block, but it shows how I pinned the layers together.  It also shows how simple it is to change a shape once it's drawn.  I thought the first star was too small so I drew a bigger one around it and used the bigger outline when I stitched.


Step 5: Attach the two layers by sewing along the drawn line of your top shape, using a thread which coordinates with your top layer.  Back-stitch at the beginning and end to secure your threads.
I used black thread to secure my layers together, since my top blocks were black.  You want this  line of stitching to blend in as much as possible.  The "underneath" layer should be the star of this block, not your stitching lines.  If your shape has inner lines (not just an outline), stitch over all of them now, as well.


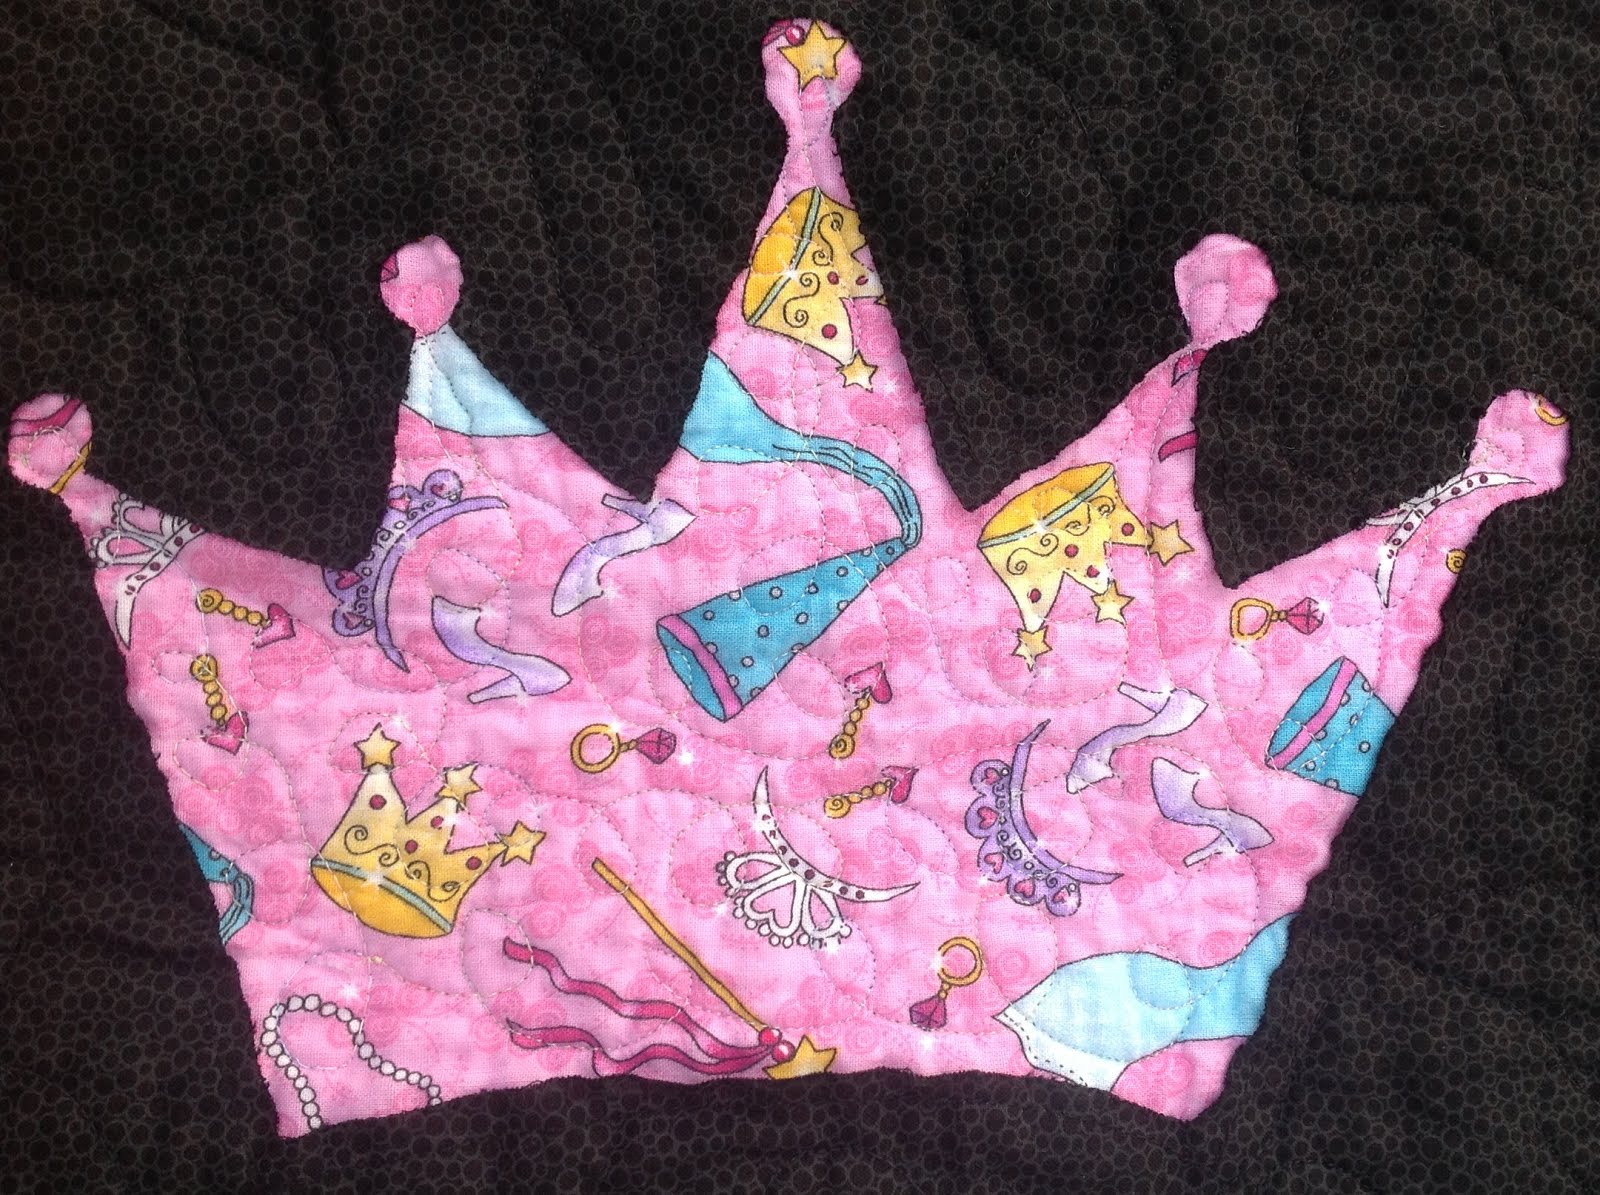
A little hard to see, but I stitched directly over that chalk line in black thread.


Step 6: Using small, sharp scissors, slowly and carefully cut away only the top layer of fabric, approximately 1/4" inside the stitching lines.
This is definitely the scariest part!  Don't worry too much, though.  I made 20 blocks and never (thankfully!) cut through the bottom layer by mistake.  I found the best way to do this is to use one hand under the block (holding the pieced layer) and one hand on top of the block (holding the center of the top layer's shape) to separate the two layers of fabric.  I snipped through the top layer just enough to get my scissors in, then laid my block face up on my sewing table.  Keeping the bottom blade of my scissors on the table and moving very slowly, I trimmed out the center of my shape approximately 1/4" inside each stitched line.  I turned my block more than my scissors as I rounded a corner.  It is OK if this is not exact or if you have some ragged-looking edges.  This edge will crinkle and curl and fray a bit in the wash and it is meant to look "rough around the edges."

Yes, this is a different block :-)


Here's what Florida looked like after trimming 1/4 inch inside the stitched lines.


If your shape has more than 1 opening, just cut each individually.


Step 7: Trim the excess pieced fabric on the back of your block.
Flip your block over and trim away any excess pieced fabric approximately 1/4" outside of your shape stitching line.  As with Step 6, this does not need to be exact, but it will help reduce bulk as you quilt the finished product.


It starts out looking like this....

And ends up looking like this.

If you have more than 1 shape, it's not necessary to cut in between all of them, just remove the bulk around the edges.


Step 8: Trim your block 1/2" bigger than your desired finished size.
I wanted my blocks to finish at 12", so once all the steps above were complete, I trimmed them (from 13") to 12.5".  My 12.5" square ruler made this pretty simple to do.  I did my best to make sure the shape was centered under the ruler, in case I hadn't placed it exactly in the middle of the square.


Step 9: Once all of your blocks are complete, determine how you will lay them out into columns and rows.  Stitch together into a completed quilt top!
At the beginning, I was planning to be very deliberate with my overall color choices, starting with dark blocks in the lower right corner "radiating" out into brighter, more cheerful colors diagonally up into the upper left corner.  However, I decided I'd rather take each block one at a time, choosing whatever color(s) best suited that block, rather than pre-determining how many blocks I'd have of each color.  Though I did opt to keep my darkest block in the lower right corner, I let my daughters help me arrange these into the overall layout.  The key here is to do what makes you smile, whether that's from a specific order of the colors or the shapes or because it's what your little girls like best.  


General Tips:
1)  I decided in advance how many blocks I would have in my finished quilt (20) and what shape would be used on each.  I wasn't sure if I'd have 20 unique shapes or not and I thought if I was short a few, I could put hearts in all 4 corners, for example.  (That didn't turn out to be the case, but I'm glad I planned the shapes in advance.)

2) Once I had the shapes picked out, I started selecting fabrics from my scrap piles.  For some shapes, I knew I wanted it to be a certain color so I just went through my scraps in that color, selecting the ones I liked best.  In other cases, a specific fabric was most important to me so I started with that and found other fabrics to go with it.  I found it helpful to pick fabrics/colors in advance for all the blocks, as well, so I wouldn't end up with too many of the same color or fabrics.  

3) For blocks with more than one opening that require a separate fabric in each, I treated each opening as it's own shape.  I drew the shape(s) first but then followed steps 3-7 for each opening, one at a time, then moved on to the next opening.  


~*~ May your day be full of Love and Ladybug Hugs ~*~

Thanks for stopping by!
~ Kat ~

Thursday, December 6, 2012

Kat Quilt -- Top Complete!

The Kat Quilt top -- which I'm calling "Angels with Flashlights" -- is done.  And I'm in love.  


Piecing the backwill have to wait until my thumb heals and I'm back from my cruise on December 17th.  It will take every ounce of willpower not to just curl up under this flimsy!

Though the reason for this quilt stemmed from a tragic event, I will be only happy when I look at it.  It reminds me of light shining through the darkness.... of angels with flashlights who lit my path in the darkest of times.

If you want to know the story behind a specific block (shape, color or fabric), you can use these links:

Edited to add this link to a post which shows how I made my blocks.

~~~~~~~~~~~~~~~~~~~~~~~~~~~~~~~~~~~~~~~~~~~~~~~~~~~~~~~~~
On Friday, I'll link up with: 

Sarah at Confessions of a Fabric Addict for "Whoop Whoop Friday"
Karen at Sew Many Ways for "Find a Friend Friday"
Amanda Jean at Crazy Mom Quilts for "Finish It Up Friday"
~~~~~~~~~~~~~~~~~~~~~~~~~~~~~~~~~~~~~~~~~~~~~~~~~~~~~~~~~


~*~ May your day be full of Love and Ladybug Hugs ~*~
Thanks for stopping by!
~ Kat ~

Wednesday, December 5, 2012

Caught Between a Rock and a Hard Place

My thumb, that is.


While wearing wet, muddy plastic flip flops.... carrying a 10 pound brick.... balancing on 1 foot while standing in gravel.... trying to open a gate with my other foot.... I lost my balance.  Hard to believe, I know!  ;-)

As I was toppling over, all I could think about was not dropping the brick on my foot.  I was not thinking about how much nerve damage could be done to my thumb when the full, falling weight of my body slammed the brick into my thumb as I crashed into the side of my neighbor's (brick and stucco) house. 

So.... the rotary cutter can not  be used to cut pieces for the backing of my Kat Quilt.  I can barely button my jeans, let alone use a blade.  I'm disappointed the backing will have to wait a bit but the good news is that the top is done and I'll be sharing that on Whoop Whoop Friday.  The other good news is that the tape around my splint is purple.  That somehow makes it better :-).


~*~ May your day be full of Love and Ladybug Hugs ~*~
Thanks for stopping by!
~ Kat ~

Tuesday, December 4, 2012

Kat Quilt - Blocks 19 & 20

With all my Christmas projects complete, I was able to move on (guilt free) to the last 2 blocks for my Kat Quilt.  I am so excited to have all 20 of these blocks finished, so I can begin putting together my quilt!

I decided to make a "2012" block so that when I'm old (and hopefully still using this quilt!) I can remember when I made it.  I selected a giraffe print fabric (which happens to be flannel) because they are my favorite animal.  They're scrawny, blond and slightly uncoordinated, just like me :-)


This is Florida (minus the Florida Keys).  Though I'm originally from upstate New York, I've lived in Florida for almost 12 years.  I bought my first home here and both my girls were born here.  The colors represent the sand, water, blue sky and bright Florida sun.


~*~ May your day be full of Love and Ladybug Hugs ~*~

Thanks for stopping by!
~ Kat ~

Monday, December 3, 2012

Christmas Projects - Complete!

I'm super excited to have finished up a number of Christmas gift projects this weekend, so I could get back to making my Kat Quilt.  My family is going on a cruise and we'll be gone all next week, so I lose 2 weekends for sewing / wrapping / mailing.  (Poor me, right?)  I knew I had to keep the project list small this year, since I had to get them all completed (and mailed) before we leave.

First I'll share the one I'm most proud of, it's a cookbook of family recipes.  My grandmother passed away 2 years ago, she was 93 years old.  After her funeral, I wanted to make a pizza that she would always make when we saw her.  It's not a traditional pizza and I wasn't sure what she used for the crust.  I started rummaging through my mom's recipe box to see if I could find anything.  While I didn't find the pizza recipe (we figured it out later, though), I did find dozens of hand written recipes that she had given to my mom.

I made copies of all the recipes written in her handwriting, as well as a few my mom wrote down that my grandmother probably told her over the phone.  When I got home, I made copies of all the recipes Grandma had written out for me, as well.

This year I decided to scan all the recipes and compile a cookbook to give my mom, brother, sister and a few very close family friends.  I think this will be a really special gift since it includes all those recipes we're always calling each other for, and most of them are actually written in Grandma's own handwriting.

Here's the cover.  This recipe book includes mostly recipes from Grandma, but also a few others from close family friends that my family loves.  My color printer isn't working so I printed these in black and white then colored in (with colored pencils) the ladybug graphic on the cover.


The cookbook turned out to be over 60 pages long, so I grouped the recipes into Appetizers, Snacks, Entrees, Desserts, etc. and made a table of contents page for it.  Each section also has a table of contents page that lists the recipes in that section.


Here's one of the pages, with a recipe written by Grandma.  


To go along with the cookbook, I made a few more sets of potholders and matching towels.  These all measure around 9" square.  I used 1 layer of Insul-Bright and 1 layer of cotton batting.  

For my brother, who is a professional chef and also a NY Yankees fan.

For my sister.  The patchwork side is the front of the hot pad and the Minnie Mouse dots are on the back.

For my mom.  Please don't ask what I was thinking with the arrangement of that log cabin block.  That's what happens why I sew late at night.  I didn't even realize how odd it looked until *after* I had quilted it.  I have a feeling she'll like them anyway :-).

This one only has 1 hot pad.  I used an English paper piecing pattern called "Mix it Up" from Kelli at Seriously...I think it needs stitches.  I only made the mixer parts (not the background) and then appliqued it on to a beige background fabric.

Last but certainly not least, I made 6 of these little pencil pouches for my daughter to give her friends for Christmas.  

They're all the same except for the zipper color.

We filled them with some peace sign pencils, erasers and a package of M&Ms.


It feels SOOOO good to have the Christmas projects not only complete, but wrapped and ready to mail... and it's only December 3rd!  Yay!!


~*~ May your day be full of Love and Ladybug Hugs ~*~

Thanks for stopping by!
~ Kat ~

Friday, November 30, 2012

Kat Quilt - Blocks 17 & 18

Two more blocks to share today.  Only two more to make and then I can start putting together the quilt top. I'm very excited!  Of course, a lot of Christmas projects need to get completed and mailed within the next week so those last two may take a little while, but I'm still really happy with the progress.

This is a tobacco leaf covered in ladybugs.  It reminds me of my grandfather.  If you want to read more about the meaning of this one, you can look on the "Ladybug Hugs" tab at the top of this page. The third section talks about him, his tobacco plants and his ladybugs.


This one is a little quilt, made up with fabrics from some of my most favorite sewing projects.  You can see how many attempts I needed to get this centered properly.  Good thing all those chalk pencil lines will come out in the wash!


~*~ May your day be full of Love and Ladybug Hugs ~*~


Thanks for stopping by!
~ Kat ~

Tuesday, November 27, 2012

Hot Pads and Kitchen Towels

The best-laid plans of mice and men often go awry.
~ John Steinbeck in Of Mice and Men ~


I took 3 days off from work last week to spend with my kids since they didn't have school.  My husband left Friday to spend the weekend with some high school friends in New York and I just *knew* that 5 days (including the weekend) would result in the completion of every single sewing project I'd ever dreamed of.  

OK... maybe not...  

I'm not complaining, though, honest!  I had a great 5 days off, including our annual "Give Thanks Day" tradition the day before Thanksgiving, a lovely holiday meal, our annual "Decorate for Christmas Day" on Friday, lots of baking, shopping (not on Black Friday!), nail painting, eating out, ornament making, and just having fun.

I did manage to get a few hot pads and matching towels made, to give as gifts.  I can't show them all here, though, because at least 1 person who will be getting a set reads my blog :-).


The hot pads measure about 8.5 x 8.5 inches.  I sewed a strip of coordinating fabric (about 3 inches wide) to some store bought towels.  I used 1 layer of regular cotton batting and 1 layer of InsulBrite batting on the inside, to make them heat resistant.


I did a meandering FMQ on the hot pads.  These are the first ones I made and I was just getting the feel of quilting through 2 layers of batting so these are pretty basic, but all in all, I'm pleased with how they came out.


I added the binding by machine, attaching it first to the back then wrapping it to the front.  No pins required -- I love that!

This particular fabric was purchased at least 5 or 6 years ago.  I bought the "cheater" print on the front of the hot pads, along with 3 coordinating fabrics -- the green (from the binding), the small flowers (on the backs) and the watering cans (on the towels).  I'm happy to have *finally* used them --- and even for the person I had in mind when I bought them to begin with!  Better late than never?


~*~ May your day be full of Love and Ladybug Hugs ~*~

Thanks for stopping by!
~ Kat ~

Wednesday, November 21, 2012

Kat Quilt - Blocks 13, 14, 15, 16

I. Just. Love. These. Blocks!!!

They are so much fun to make and I get more and more excited each time I finish one.  I can't wait to finish up the last 4 and start putting them together into a quilt!!

This first one is a knot.  I was terribly worried about messing up the lines and connecting something I wasn't supposed to connect, but it worked out perfectly on the first try.  This one stems from a very personal, dark story that isn't mine to tell... but overall it symbolizes the way families are tied together in the most unbreakable, never-ending bond.  The dark fabric underneath is intentionally very dark, which is part of the this knot's back-story.


This is New York state, where I grew up and lived until I was 25 years old.  I made it green to symbolize the lush trees and farmlands around my home town.  I put a ladybug over the area where I grew up.


This princess crown will remind me of the child within me, and that you're never too old to be a princess.  The fabric is from the second dress I ever made my daughter and I thought the princess accessory print was perfect just the way it was, so I decided not to do any piecing on this block.


This is a runner.  Running has become my passion over the last year and a half.  I searched far and wide for just the "right" graphic to use on this one.  It wasn't easy to find a "simple" shape that still looked like a runner, but I like the rounded, fluid lines on this one.  (Thank you, Internet!)  It doesn't show well in this photo, but the fabric is a neon / lime green, suggested by my daughter because I always wear bright colors when I run.  I say it's because "neon makes you faster" --- but in reality, it makes you so visible to people that you're embarrassed to slow down.  Hey, whatever works!


~*~ May your day be full of Love and Ladybug Hugs ~*~

Thanks for stopping by!
~ Kat ~