Monday, April 30, 2012

H2H 2012 Update & FMQ Tips Request

Are you participating in the Hands 2 Help 2012 Challenge over at Sarah's blog?  If not, check it out, there's still time to sign up to make a quilt for one (or both) of two great charities!  

This is the first time I've ever signed up for a quilting challenge.  Though incredibly intimidated to know my quilt will be next to ones made by insanely talented people, I am still very excited to be participating.  I've learned a lot while making this quilt -- mostly about free motion quilting (FMQ).  I've written a little bit about this quilt here and here, but I didn't get to quilting until this past weekend.

Having FMQ'd a grand total of *one* other quilt before, I knew this was going to be a piece of cake.  Maybe even easier than cake, since I had since purchased a really big extension table for my Singer, to help me support the quilt.  I mean really, I'm an expert now, right?

*sigh*

Let me just say that I ripped more stitches out of this quilt than I left in.  I tried 3 different threads, every possible combination of tension and stitch length, crying, wine drinking and for good measure, a few select curse words.  I finally decided to change my needle (because honestly, it's the only other thing on the machine that I know how to do).... but it did seem to help.   

This is far from "good" but now that I've had time to dry the tears, I think I'm willing to call it "OK."  The quilting is much more dense on one corner of the quilt than the rest, there are about a million stops and starts, but I'm feeling pretty confident that it won't fall apart in the wash.

There is no rhyme or reason to my quilting. My only goal was to not have to rip more stitches out. 

I will definitely be researching some FMQ "patterns" (I use that term loosely) to work on, since my current FMQ reminds me of tentacles.

On the back of the quilt... a little easier to see on the yellow and blue.


Of course, now that I was *really* a FMQ expert (having completed a grand total of *two* FMQ'd quilts), I decided to keep right on going.  The flimsy for this next quilt has been finished and hanging over my banister for at least 2 years, probably closer to 3.  About 6 months ago, my kids asked if I was ever going to finish it, or if they could use it to make a tent.  Ahem!  

I pin basted it and then hung it back over the banister to quilt "tomorrow."  (Did I mention that was at least 6 months ago?)  Anyway... since the machine was already (finally) on the right settings, I decided to give it a go.  The second quilt went MUCH better than the first.


Well, except for this.  Whoops!  (I'd already taken out about half the stitches before I decided to take a picture... this corner was completely covered.)


I decided to be SUPER ambitious and try my hand at writing a name in my quilt.  This photo still has the marking pen lines, but it's easier to see this way. I also practiced loopies in the purple borders and more "tentacles" in the pink sashing between the blocks.


I added hearts to the center of each block.


Here's a shot from a little farther back.  The hearts still have blue marking pen under them but I washed it off the name and - wow! - I can actually read it!!


I would LOVE any "FMQ for beginners" tips you might have to share, or links, or books, anything!  As you can see, my designs need some work but I want to start with baby steps.  Really, really small ones :-).  If you have any suggestions for me, please leave them in the comments.  Thanks in advance!!


~*~ May your day be full of Love and Ladybug Hugs ~*~

Friday, April 27, 2012

Mug Rug, Brick Quilt & a Personal Record

I had another less-than-ideal sewing week, but I did manage to start (and finish!) a small project I've been wanting to try, as well as start a long overdue birthday gift for a friend half way around the world.  However, the "finish" I'm most proud of this week has nothing to do with sewing.

Last Sunday, I ran in a 5k race called "Sprint for the Cure," with proceeds to benefit the Florida Brain Tumor Association.  I call myself a "runner" like I call myself a "quilter."  I like to do both and I'm decent at them, but neither gets as much dedicated attention as I'd like.  I've only run a handful of "official" races since I began running about 1 year ago, but I had a definite goal time in mind for this race.  I'm not fast (and I'm OK with that)...  I prefer to focus on distance over speed.  However, I had a goal to run a 5k (3.1 miles) in less than 30 minutes.  I'm SO happy to say I finished this race in 28:20.  I'm done making 5k goals.... on to 10k's now!


With my 2 favorite girls after the race.
Notice that their little skorts matched the color of my lucky running shirt.


We won a pretty awesome gift basket at the race's silent auction.  It was taller than my 5-year-old!


You might remember these pictures from last Friday's post.  I said I wanted to make something with these:


That had something to do with this:


I know, I know... the suspense is killing you, right?  Well, he's my first ever mug rug:
I "winged it" with a wonky log cabin design.


I got to try a lot of things I've been seeing on other blogs -- like using blue painter's tape as a stitching guide, straight line stitching (which took longer to do that assembling the entire top of the mug rug!), basting spray to attach all the layers and hand-stitching the binding to the back.


The mug rug, black mug and canister of Vietnamese coffee will be a Mother's Day gift for my friend Kim,who mentioned to me how hard it is to find Vietnamese coffee here in the States.  (Amazon.com has *everything*!!!  LOVE that site!)


Last but not least, I started a blue brick quilt, which will be a (very) belated birthday gift for my dear friend Sujay, who lives half way around the world in Pune, India.  More about him when the quilt is done.

I was inspired by Sarah's blue brick quilt, which she made using this pattern/tutorial from Amy Smart.

I'm using all stash fabric.  Sujay's favorite color is blue but I only had 6 blues that weren't a floral print.  I am arranging the bricks in a pattern, which I probably wouldn't do if I had a larger variety of blues to start with.


This is my oh-so-sophisticated way of remembering which order to sew the bricks in, since I'm chain piecing.  I sew in my dining room (thus, glass door on the china cabinet) and the blue painter's tape was already hanging around from the mug rug.... seemed to be the perfect solution!).


~~~~~~~~~~~~~~~~~~~~~~~~~~~~~~~~~~~~~~~~~~~~
I plan to link up with: 


I'm looking forward to seeing what you've worked on this week!


~*~ May your day be full of Love and Ladybug Hugs ~*~

Friday, April 20, 2012

Slow Sewing Week

Didn't get a whole lot of sewing done this week.  Sometimes "life" takes up a lot of time.  I did manage to finish the top for my H2H 2012 quilt (more here) and also pieced the back this week.  I was planning to sandwich and baste it but the batting I have isn't wide enough.  Guess I'll be going to the fabric store this weekend!  Actually, on second thought.... a fabric store is not the best place for a girl on a self-imposed fabric fast.  Maybe I'll just order it online.


This is the back I pieced for the H2H Challenge.


It goes with this top.


This weekend I'm hoping to get the above quilt at least basted, if not quilted.  I still have to figure out the binding.  That turquoise was supposed to be the binding but the quilt was a teeny bit too small so I had to use it for the border.  I'm hoping I have enough scraps left to piece a binding with the same colors that are on the front of the quilt, but we'll see.


I'm also hoping to accomplish something with these scraps.


I won't say exactly what it's going to be, but here's a pretty good hint.


I won't be linking up anywhere this week (since I don't really have a "finish"), but I'm looking forward to checking out what everyone else has done at:

Crazy Mom Quilts for  "Finish it Up Friday" 
Confessions of a Fabric Addict for "Whoop Whoop Friday"

Edited: I just found a great new blog called "Sew Many Ways."  Linking up there for "Find a Friend Friday."  If you haven't seen this yet, check it out!


~*~ May your day be full of Love and Ladybug Hugs ~*~

Wednesday, April 18, 2012

H2H 2012 Flimsy Complete!

Have y'all seen the Hands 2 Help Charity Quilt Challenge over on Sarah's blog?  If not, go take a look, there's still plenty of time to make a quilt for one (or both!) of two awesome charities!


I'm happy to have finished my flimsy, which I'll be donating to Happy Chemo.  Due to my 2012 Fabric Fast, I used all stash fabrics for this quilt.  I don't usually name my quilts but if I did, this one would be called "Comedy of Errors."  Oh well.... the flimsy is done and both of my daughters (ages 5 and 8) have asked if they could keep it, so I feel pretty confident that some little girl will really like it, even if the blocks aren't all completely square and it has a border I never intended to add.  But I digress....


I was inspired to use the Hidden 9 Patch pattern when I saw a great butterfly quilt in this post on Sarah's blog.  It looked so cheerful that I knew I wanted to try it.  She sent me a photo of one she'd made with only 2 colors on the sides so I opted for that approach.


I started with these 5" blocks.
I actually used 2 blue princess prints - the one you see here and one that has a smaller (but coordinating) print.  Didn't have enough of either one in the stash for a whole quilt, so I combined the two of them.

And came up with this.


Here's a close-up that shows the colors a little better. You can see both blue princess prints here.
I'll take pics in better lighting once the whole quilt is complete.

I'm not yet sure what I'll back it with.  Back to the stash to find some more fabrics to piece together!  The blue in the border was supposed to be used for the binding, but the quilt wasn't quite big enough so it became a border.  I think I'll aim for a bright pink binding now, if I can find some in my stash.  

I'm also not sure how I'll quilt this.  I'd like to practice my FMQ, but I'm not sure what color thread I'd use.  I'd also like to play with the painter's tape straight line quilting technique.  But alas, some of my seams are off so I'll probably opt for stitching in the ditch, since I think that helps bury (and hide) some of the imperfect corners.

Hoping to have the backing done and have this all sandwiched together for quilting by the end of the weekend.


~*~ May your day be full of Love and Ladybug Hugs ~*~

Friday, April 13, 2012

Hip to be (not) square

Part of my "day job" involves managing -- to the penny -- multi mullion dollar projects.  Being able to reconcile financials across 50+ teams and 400+ people makes me very well qualified to do the math required to successfully modify pattern sizes for my sewing projects.


Note: Only one of the above sentences is true.  I'll let you decide which one.


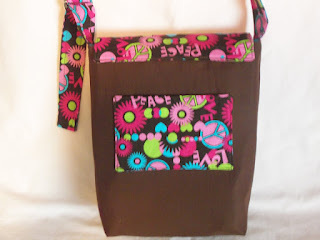
My daughter asked me to make a purse-size messenger bag for a friend's birthday party this weekend.  I've used this free pattern multiple times in the past with really good results.  I decided to modify it slightly to make a smaller version, which would finish at 8" high, 8" wide, 3" deep.


Here's my modified version... which measures 9" high, 6.5" wide, 3" deep.  One out of 3 ain't bad??? *sigh*  And of course, the flap is too short for the bag... partially because the bag is 1" too tall... partially because of my stellar math / pattern translation skills.


My daughter picked the fabric from my stash.

I added a heart-shaped peace sign on the (too short) flap.  The lining is the same blue as the peace sign and there is a divided pocket on the inside, as well.  The strap is adjustable.

This is the back of the bag... that's another pocket.  


Well it sure looks good when *she's* wearing it!!  (Isn't she beautiful?  Pretend this photo isn't dark and shadowy and that her gorgeous copper-red hair is shining!)


Of course, my beautiful model has now requested one for herself.  I think I'll stick with the wonky bag measurements (I'm afraid of how much worse it could be next time) and instead just add 2" to the length of the flap, so it hangs all the way down over the front of the bag.  


Oh, and did I mention *sigh*?


PS -- My beautiful model is looking over my shoulder as I type this, and just said to me, "You messed up?? I think it looks great!"  Bless you, my beautiful girl!!


~~~~~~~~~~~~~~~~~~~~~~~~~~~~~~~~~~~~~~~~~~~~

Linking up with: 
Crazy Mom Quilts for  "Finish it Up Friday" 
Confessions of a Fabric Addict for "Whoop Whoop Friday"


I'm looking forward to seeing what you've worked on this week!


~*~ May your day be full of Love and Ladybug Hugs ~*~

Thursday, April 12, 2012

Finishing up some WIPs

I feel like it has been forever since I finished a quilt (it's been about 3 weeks... that's forever!) but I promised myself I'd finish off some of my non-quilt WIPs before I tackled another quilt.  I managed to get 2 done this week, with 1 more not too far behind.


This first one is (obviously, I hope!) an apron.  My sister attended a catalog party in January, where they were selling purses, aprons, bags and other items.  Her friend was interested in a cute black and white apron, but the pricetag was $30.  I had made an apron for my sister in the past (using Butterick See & Sew pattern B4585).  It took less than 1 hour to make and about 1 1/4 yards of fabric.  She asked if I could make a black, white and pink apron for her friend Amber.  Who am I to say no to a sewing project??


I swear this looks cuter in person! 


My husband pointed out that the "A" looks like the logo for the Atlanta Braves (baseball team).  I'm hoping Amber won't think so!  The waist ties are made the same way as the neck strap, using polka-dot fabric with pink grosgrain ribbon sewn down the middle of each one.


This pocket *is* actually straight.  It's my photography skills that are crooked!  I used a ruffled ribbon along the top of the pocket to add in a bit of color.


My second finish this week was a pillow, which will be a gift for my older daughter's BFF, Ashlee.  Her birthday isn't until early May, so I'm super happy to have this one done in advance!  I got the idea from AmandaJean, and used some leftover blocks from a quilt I'd made Ashlee for her birthday last year.  I just cut the blocks into smaller pieces then sewed them back together again.  Easy peasy!


Here's a photo of the quilt I made Ashlee last year.  I forgot to take photos before the party (ok... the truth is we were late to the party because I was waiting for this to come out of the dryer and I didn't have time to take photos... but let's not get too hung up on the details, OK?).  This photo was (obviously) taken at a bowling alley between cake and the 6th frame. 


That's my redhead (Rachel) on the right and my little one (Jessica) peeking out from underneath.  Ashlee (Rachel's BFF) is on the left.


~*~ May your day be full of Love and Ladybug Hugs ~*~

Friday, April 6, 2012

Easter Egg Skinny

I've completed my second monthly "Seasonal Skinny."  Since Easter is this month, I opted for an Easter Egg.  As usual, I didn't follow the pattern exactly (I made a zig-zag egg instead of plain stripes, using AmandaJean's tutorial here for triangle-free zig-zags).  This finishes at about 14" x 28" and I'm planning to make at least one each month this year, to correspond with a holiday.  I'm hoping to make a few others (such as the birthday cupcake and the ladybugs) which don't tie to any specific month.  The patterns are easy to follow and I used only scraps / stash.


I hang these on the wall but I suppose they'd make cute little table runners, too.


Triangle-free zig zags were easy to do, once I figured out which order to sew the colors in!


I used Heat 'n Bond to hold the egg to the background fabric, and a variegated pink thread to do a quick zig-zag stitch around the edge.  I stitched in the ditch above and below each of the other zig-zagged colors.


You can see my March (Shamrock) Skinny here.  My Skinny for May will be (drum roll, please).... ladybugs!!


~~~~~~~~~~~~~~~~~~~~~~~~~~~~~~~~~~~~~~~~~~~~

Linking up with: 
Crazy Mom Quilts for  "Finish it Up Friday" 


I'm looking forward to seeing what you've worked on this week!


~*~ May your day be full of Love and Ladybug Hugs ~*~

Tuesday, April 3, 2012

Huggy Star Quilt

One of my dearest friends, Brenda, gave me a piece of fabric last July and asked me to "make her something nice" with it.  She has a thing for stars like I have a thing for ladybugs.  She had purchased the fabric a while ago then didn't know what to do with it.  My goal was to make her a Christmas (2011) gift with it but alas, I ran out of time.


This "huggy quilt" measures 27" wide x 58" long.  It's made to be a wrap (vs. a full quilt) so that she can wrap herself in a hug whenever she needs one.


The pattern was very simple, as you can see.  I used 5 different ivory / oatmeal tone-on-tone prints from my stash for the squares, and added in some light blue rectangles.  I used Brenda's dark blue star print fabric for the appliqued stars, backing and binding.


I didn't realize how not-so-great these pictures were until just now and alas, the quilt is already in the mail so retakes aren't possible.  I'm sure you'll get the idea!


Couldn't resist taking this photo in our awesome South Florida sunshine with a palm tree and puffy white clouds!


This is the embroidered quilt tag I made a few weeks back (post / tutorial here) but alas, I didn't take a photo of it on the quilt.  *sigh*  I have to get better at this picture taking stuff!


~*~ May your day be full of Love and Ladybug Hugs ~*~